One of the best ways to show someone you care is through cooking. This year, many couples are going to be opting for a night in rather than booking a reservation, and cooking a delicious, mouthwatering three-course meal you both can savor is one way to enjoy the occasion.
Whether you’re an experienced chef or this is your first attempt at a three-course meal, this is the perfect all-inclusive guide to impressing your dinner date this Valentine’s Day.
What do we suggest? For our appetizer, we’re using a slow cooker for a simple cheese fondue, perfect for dipping to your heart’s content. Get started with this recipe.
Following fondue is an incredibly fitting heart-shaped ribeye, cooked to tender perfection on the grill. This romantic main dish is sure to woo next to your chosen sides. Get started with this recipe.
Lastly, there’s no dessert more classic for Valentine’s Day than chocolate-covered strawberries. To add a finishing shine to your dessert, we’re showing you two easy ways to temper your chocolate. This method means you can prepare your dessert ahead of time, as well, which we recommend for first-timers! Get started with this recipe.
For making a memorable Valentine’s Day dinner date at home, the following three meals are sure to be talked about years later:
Cheese Fondue
Fondue feels romantic – you can practically picture yourself at an upscale restaurant being served a dish of hot, melted cheese – but it’s also fun to eat and prepare.
Although a few types of fondue exist, we suggest starting off your Valentine’s Day dinner date with the traditional cheese variety. For some context, this version of fondue was developed in Switzerland to repurpose hard cheeses and old bread. Hence, cheeses like gruyere and Emmental were melted down with wine, brandy, or cognac until they resembled a liquid. This savory combination was then served with chunks of crusty bread.
Here’s our recommendation to impress on Valentine’s Day with a classic fondue recipe.
Valentine’s Date Night Recipe
Time to Prepare
10 minutes
Estimated Cook Time
45 minutes
Serves
2-4 People
Ingredients
- 3/4 cup dry white wine
- 7 oz. gruyere cheese
- 7 oz. Swiss cheese
- 7 oz. fontina cheese
- 1 garlic clove
- 1 tbsp cornstarch
- 1/2 tsp nutmeg (optional)
Recommended tools for the job:
- Flame Boss Wi-Fi Thermometer
- Slow Cooker
- Fondue Forks
Preparation
- Pour your white wine into a slow cooker set to high. Wait five minutes to allow your wine to heat up.
- Grate your cheese, and peel and smash your garlic clove. Add your garlic clove to the wine, and let those flavors incorporate for one minute.
- In a large bowl, add all your cheeses, nutmeg, and cornstarch, and then mix together.
- Remove your garlic clove, and add your cheese mix to your slow cooker. Cook on high, occasionally stirring.
- Use your Flame Boss Wifi Thermometer to insert a prong into your fondue, and set your desired temperature for 150°F.
- Once you're notified that your fondue has reached 150°F, remove your thermometer, and turn the slow cooker down to low. Mix one last time, and you're ready to dip!
- Use your favorite fruits, vegetables, and bread to dip. We also recommend apple slices, cauliflower, or soft pretzels for some variety, but the possibilities are endless.
Your Valentine’s Day date night appetizer is complete, and you’re now ready to move on to the entree.
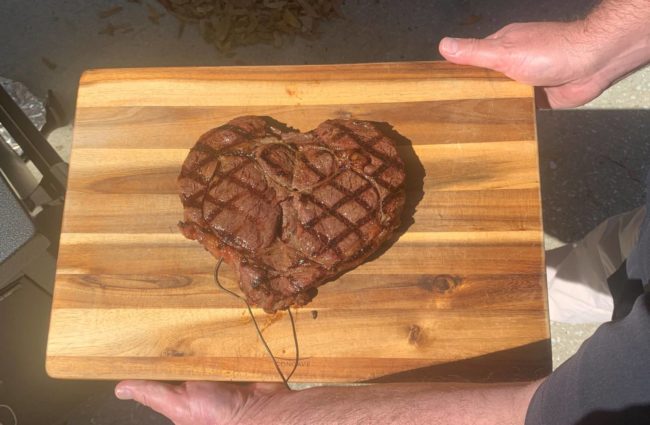
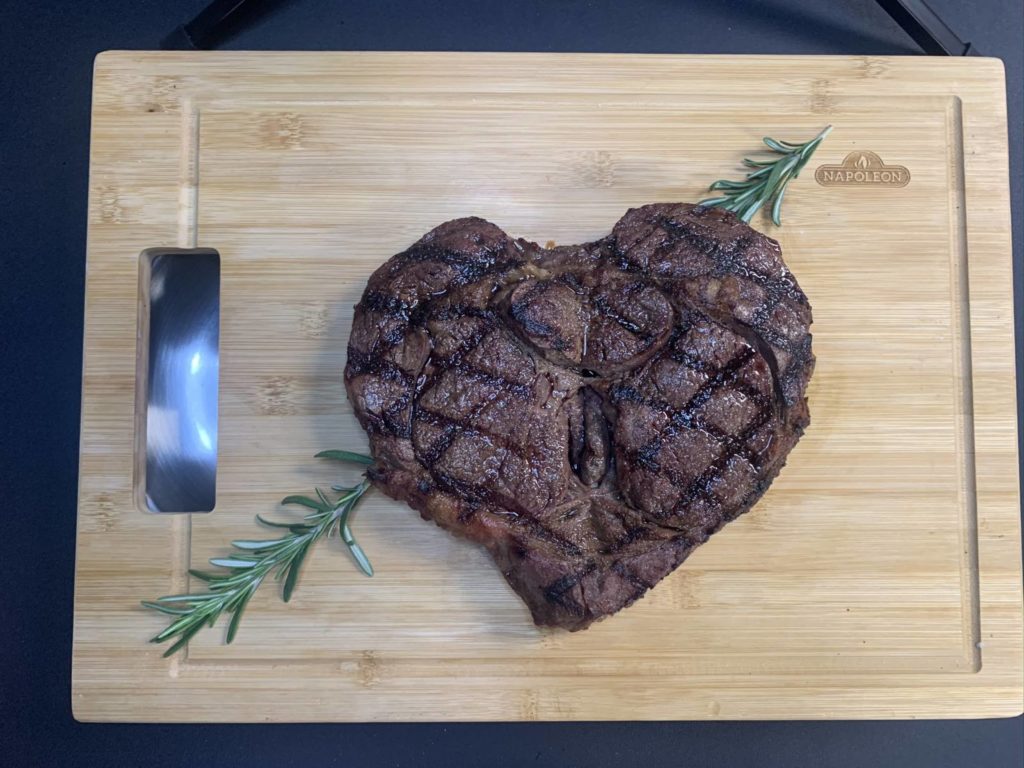
Ribeye Steak
It’s time for the star of the show, our heart-shaped ribeye steak. This simple main dish is both festive and flavorful. What makes a ribeye so special for Valentine’s Day? For one, a buttery, intense flavor and incredibly tender texture define this dish.
While preparation and cooking are key to success, these characteristics also merge through the cut of the meat. Part of the primal section, the beef rib sits between the chuck and the loin and is located in an area with more fat. Utilizing ribs six through 12, this cut stands out with distinctive marbling.
As the cut of meat cooks, the white lines you initially see melt into the steak, adding to the tenderness and the flavors you’ll soon taste.
To add more pizazz to your plate’s presentation, place unused rosemary on either side of your steak to represent cupid’s arrow.
Ingredients & Tools
- 3″ thick ribeye w/ tail
- Salted butter (melted) or spray butter
- Non-stick cooking spray (PAM)
- Rosemary
- Preferred steak seasoning
- Flame Boss Wifi Thermometer
- Quality hardwood lump charcoal
- Basting brush
- Grill grates (optional, but awesome!)
- Quick-read thermometer
- Aluminum foil
- Cutting board
- Spatula
Directions
- Set up your grill for indirect heat at 200°F.
- Take the ribeye out of the refrigerator one hour before cooking, trim for desired shape (heart), and season 15 minutes before cooking with your favorite steak seasoning.
- Take the steak off the grill when the internal temperature reaches 100°F.
- Set grill up for direct heat around 450°F-500°F.
- Place grill grates in the middle of the grill.
- Cook steak 1 to 1½ minutes on each side, depending on thickness (flip three times for grate marks).
- After each time flipping the steak, spray or brush on melted butter.
- At a 130°F internal temperature, remove the steak from the grill.
- Loosely tent in foil, and rest for 10 minutes.
- Lightly season the steak and serve.
Chocolate-Covered Strawberries

Lastly, we’re onto dessert. Succulently sweet-meets-crunchy chocolate-covered strawberries have become synonymous with Valentine’s Day, which makes them the perfect finale to your three-course meal.
Tempering chocolate is the best way to have dipping chocolate and creates a shiny, snappy finish when done properly. The process can sound intimidating, but we’re going to show you two methods, both of which are fairly simple.
Tempering Basics
Tempered chocolate is achieved when its crystallizing properties are still present when your melted chocolate dries. To do this, you have to heat and cool the chocolate to specific temperatures, so a thermometer is a must. We recommend using the Flame Boss Wifi Thermometer for an extra reminder at the proper temperatures.
To get started, here are a few important things you need to know about chocolate. You’ll need real chocolate: Although the exterior of the packaging will claim you’re getting a real cocoa-based product, an easy way to tell is to read the ingredients list. Real chocolate will include cocoa butter.
Secondly, due to the oily nature of cocoa butter, chocolate and water don’t mix. As such, make sure all of your surfaces and utensils are completely dry before starting your Valentine’s Day dessert. Even a single drop can ruin all of your hard work and cause your chocolate to seize!
With these basics out of the way, let’s talk about the first method:
Method #1: Seeding
- Measure out ⅔ of your chocolate. This is going to depend on how much you want to make. Set aside the other ⅓ for later.
- Prepare a dry, heat-safe bowl for double broiling. Stainless steel or glass should work, as long as it can safely handle the heat. Add your ⅔ of chocolate.
- Use a saucepan to simmer water but not boil. When you’re ready, place your chocolate bowl over the saucepan, making sure it’s not coming in direct contact with the water.
- Place your thermometer inside the saucepan. The Flame Boss Wifi Thermometer is a great option, so you can have both hands free to stir after inserting the probe.
- Continuously stir and melt all of your chocolate until it fully has a liquid consistency – no lumps. Dark chocolates burn at 120°F, while milk and white chocolate will burn at 105°F. Aim to remove your chocolate from the stove five degrees before these benchmarks (115°F and 100°F, respectively).
- Now, you’re going to cool down the chocolate. Be patient, because this may take a while. To speed up the process, it helps to transfer your melted chocolate into a different bowl. Don’t forget your thermometer!
- Using the ⅓ of chocolate you set aside earlier, stir in a little at a time, keeping a consistent motion. Continue to add in your seeding chocolate, and stir until you reach 82°F.
- Once your thermometer reads 82°F, place your bowl back over the saucepan. (If you switched bowls, make sure it’s still heat safe.)
- Reheat your dark chocolate to 87°F. If you’re using milk or white chocolate, reheat to 85°F. When you reach the right temperature, quickly remove the bowl from heat, and your chocolate should be tempered.
- Our final step! Use a spoon to test your chocolate on a piece of parchment paper. Spread a thin layer of chocolate, and wait for it to dry. It should have a shiny finish. Remove it from the parchment paper, and make sure it leaves no residue. Break it in half and listen for a satisfying snap!
Method #2 Microwaving
- Place your chocolate pieces in a microwave-safe bowl.
- The goal of this method is to microwave melt your chocolate slowly, keeping the temperature below 90°F. Place your bowl inside the microwave and do a 30-second burst.
- Remove the bowl from the microwave, and mix the chocolate, evenly distributing all the melted pieces, and checking the temperature.
- Keep microwaving your chocolate in smaller bursts each time, every time checking the temperature, and mixing to cool it down. At the end, you may be microwaving for just five seconds at a time! Just be patient, and remember not to stay below 90°F.
- When all of your pieces are melted, you’re finished! Test your chocolate on parchment paper, just like the seeding method.
Congratulations! You’ve successfully tempered chocolate! You now have glossy chocolate that will snap when bitten, melt effortlessly in your mouth, and store beautifully at room temperature. Use your strawberries to dip and spin right away to get the perfect finish. Don’t wait too long, or you’ll risk losing the ideal temperature!